If you’re using Selenium to automate your application’s UI tests, at some point, you’ll need to scale your testing. This means not only running tests on multiple platforms, browsers, and browser versions, but also running tests in parallel, using either Selenium Grid or a cloud vendor like Sauce Labs. In the past this has been an either/or choice, but here we’ll show you how you can combine them!
Selenium Grid has been a native part of the Selenium project for more than 10 years. It’s mature, easy to adopt, and very versatile in its configuration. For small, nimble operations, a local Selenium Grid is a good starting point for test execution.
At some point, however, running a Selenium Grid wholly on-premise or in a self-managed cloud can become a real maintenance nightmare, so I’ll explain how to offload some of that headache to a managed cloud. Whether you want to retain some browser configurations locally, or you want to switch over to the cloud for all your needs, the Selenium Grid is flexible enough to do whatever you need.
Introducing: The Relay Node!
Selenium 4 saw a ground-up rewrite of the fundamental Selenium Grid architecture. Details are here, but one of the most exciting features is the [relay] option.
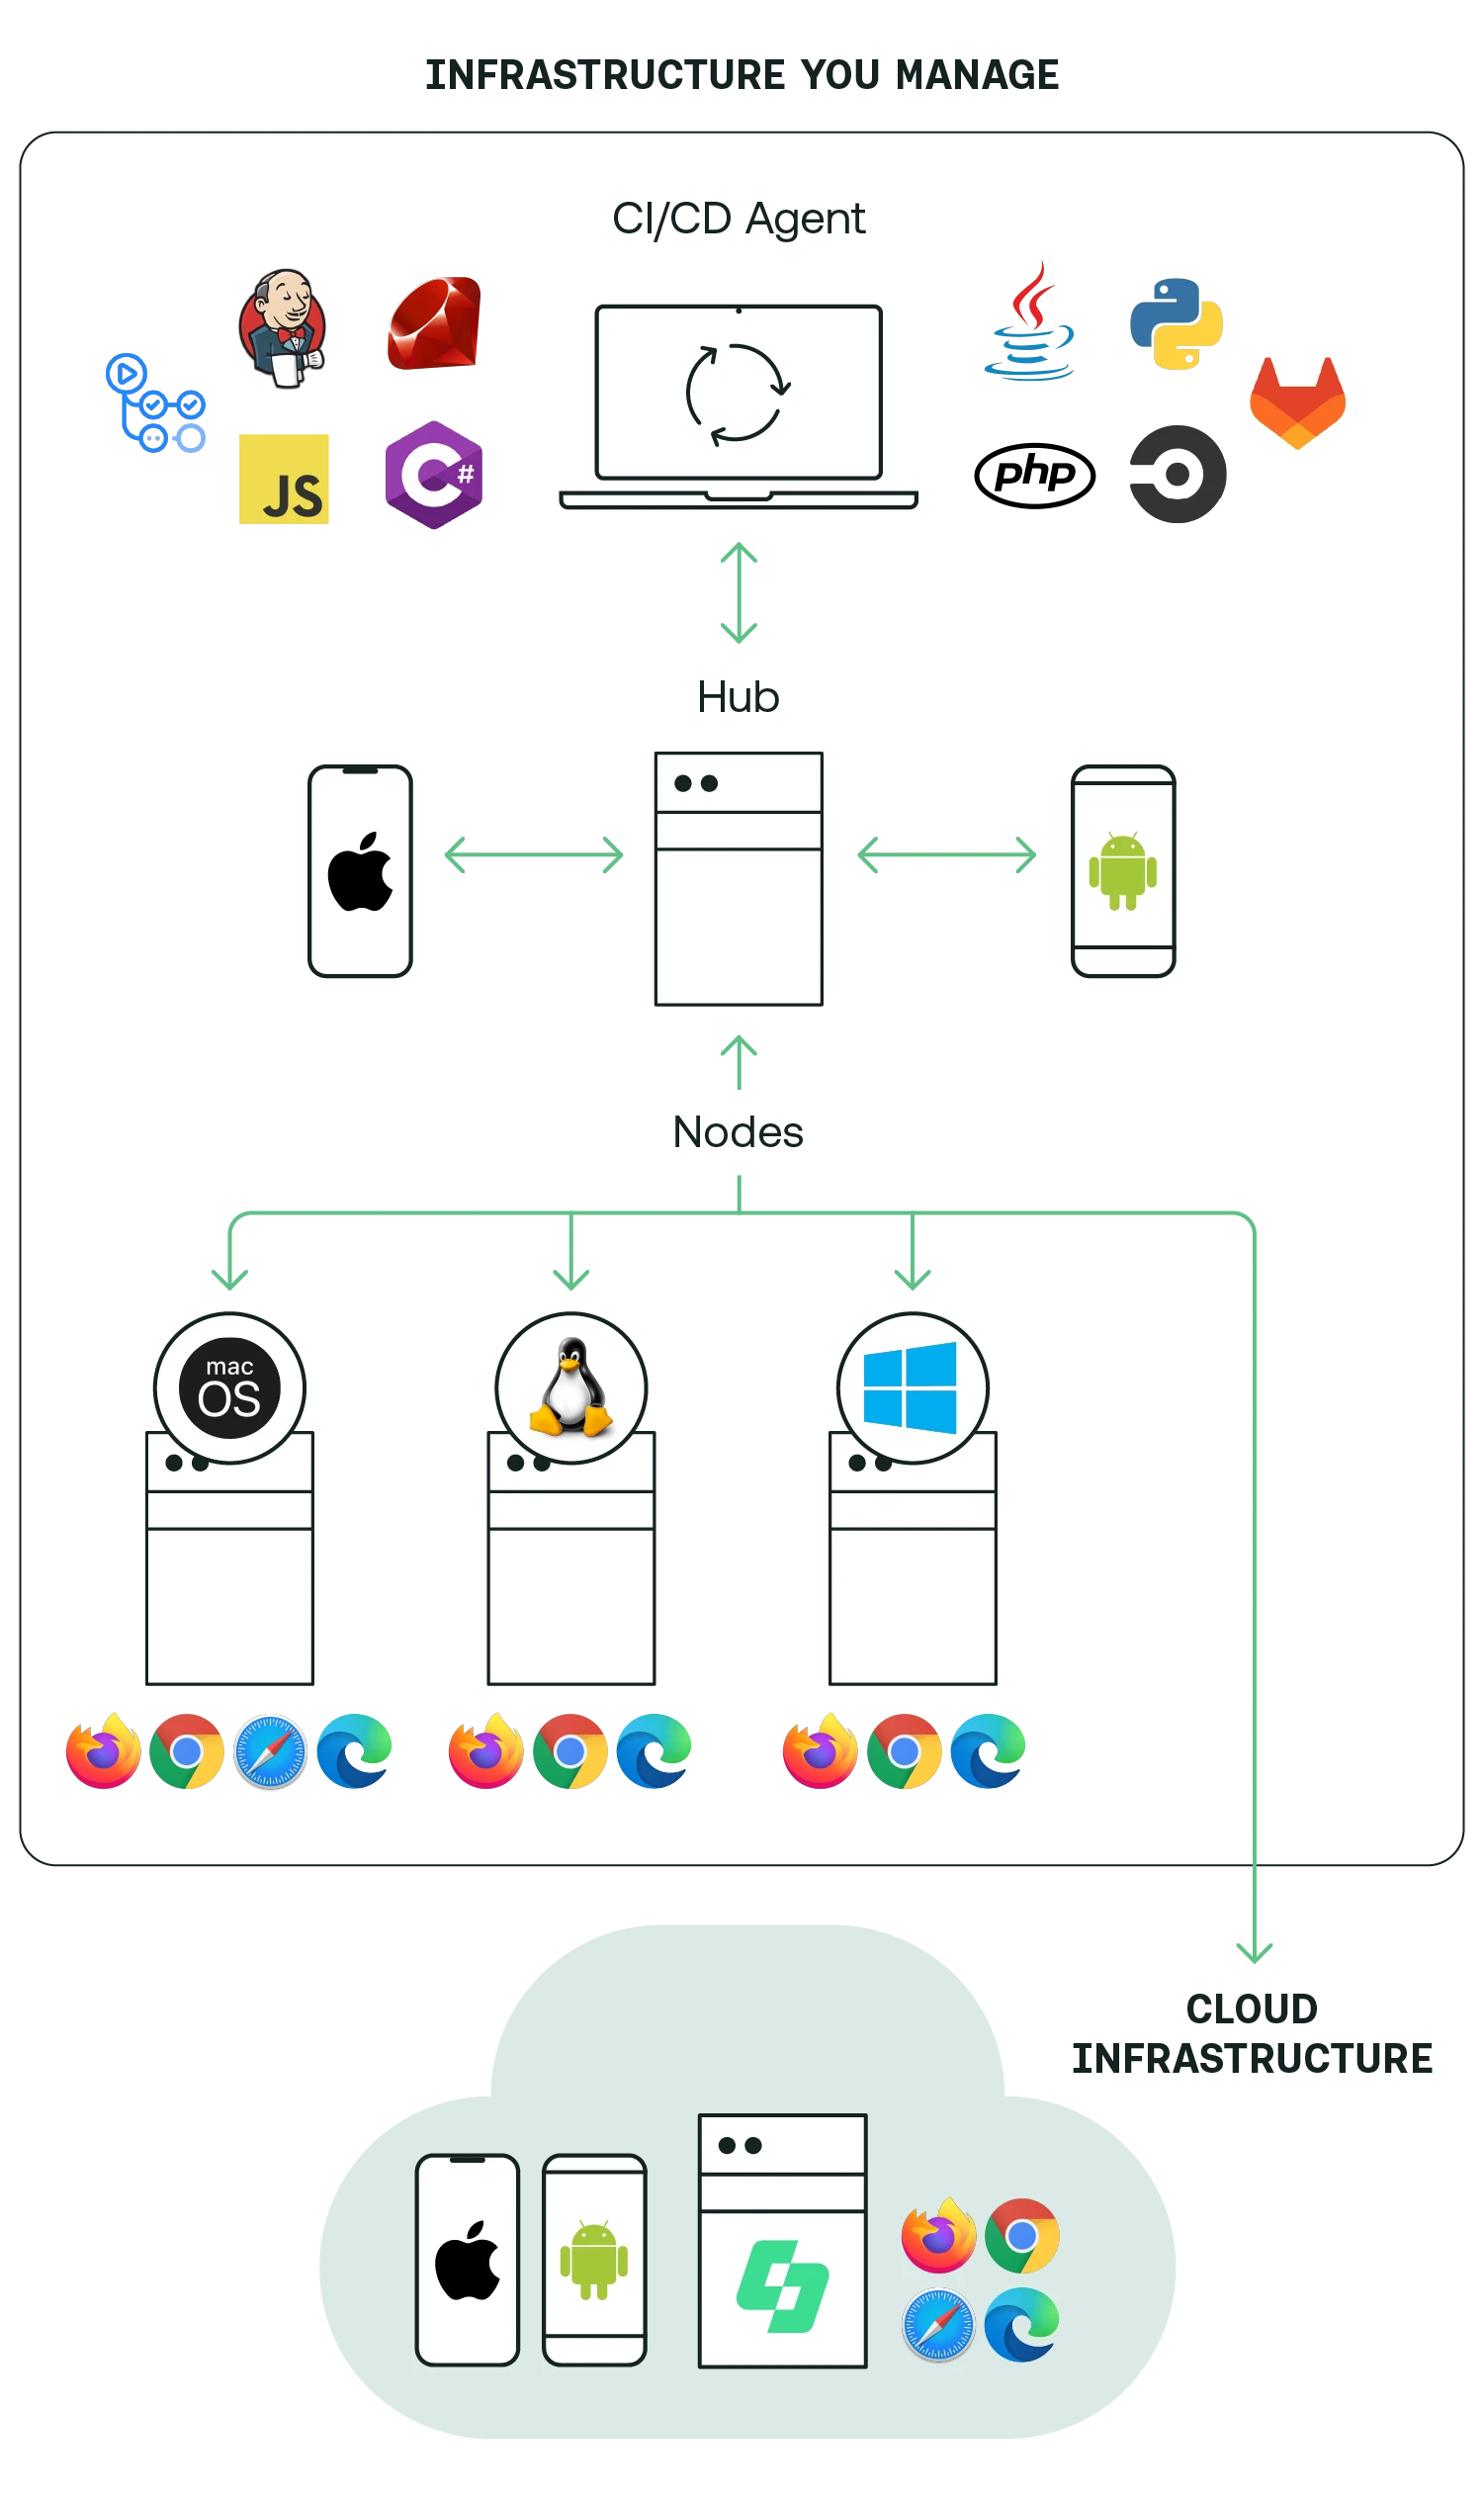
This option allows you to route Grid tests to another Grid, another network, or a cloud vendor like Sauce Labs.
For example, you could have 10 Nodes running locally or on AWS, all handling Chrome requests. If you suddenly need to be able to run Safari, it would generally be much easier to set up a Relay Node to Sauce Labs than it would be to set up a farm of Mac Minis on a nearby desk. To do this, you would go to Sauce’s sign-up page, get an automated testing plan, and start running one more Grid Node with a slight tweak to the config (details below).
More examples of “spillover” to a cloud vendor:
You have 10 Nodes running locally, but suddenly you’re required to run 100 tests at a time as other teams are onboarding and hoping to use your grid.
Your grid is running Chrome and Edge, but is only configured to run “latest”. Suddenly you need to reproduce an issue in Chrome from 5 versions ago. Having a Relay Node would allow you to do this with no changes to your existing Grid.
You’ve decided to migrate to a cloud provider, but the transition itself might cause too much disruption to your CI/CD configuration. The Relay Node allows you to make this one change, and keep those configurations running perfectly.
You find that, over time, it becomes more and more of a pain to keep these Grid Nodes up-to-date and running. With the Relay Node, you slowly migrate away from maintaining your own grid, and let the cloud take over the work–while executing your tests in exactly the same way as before.
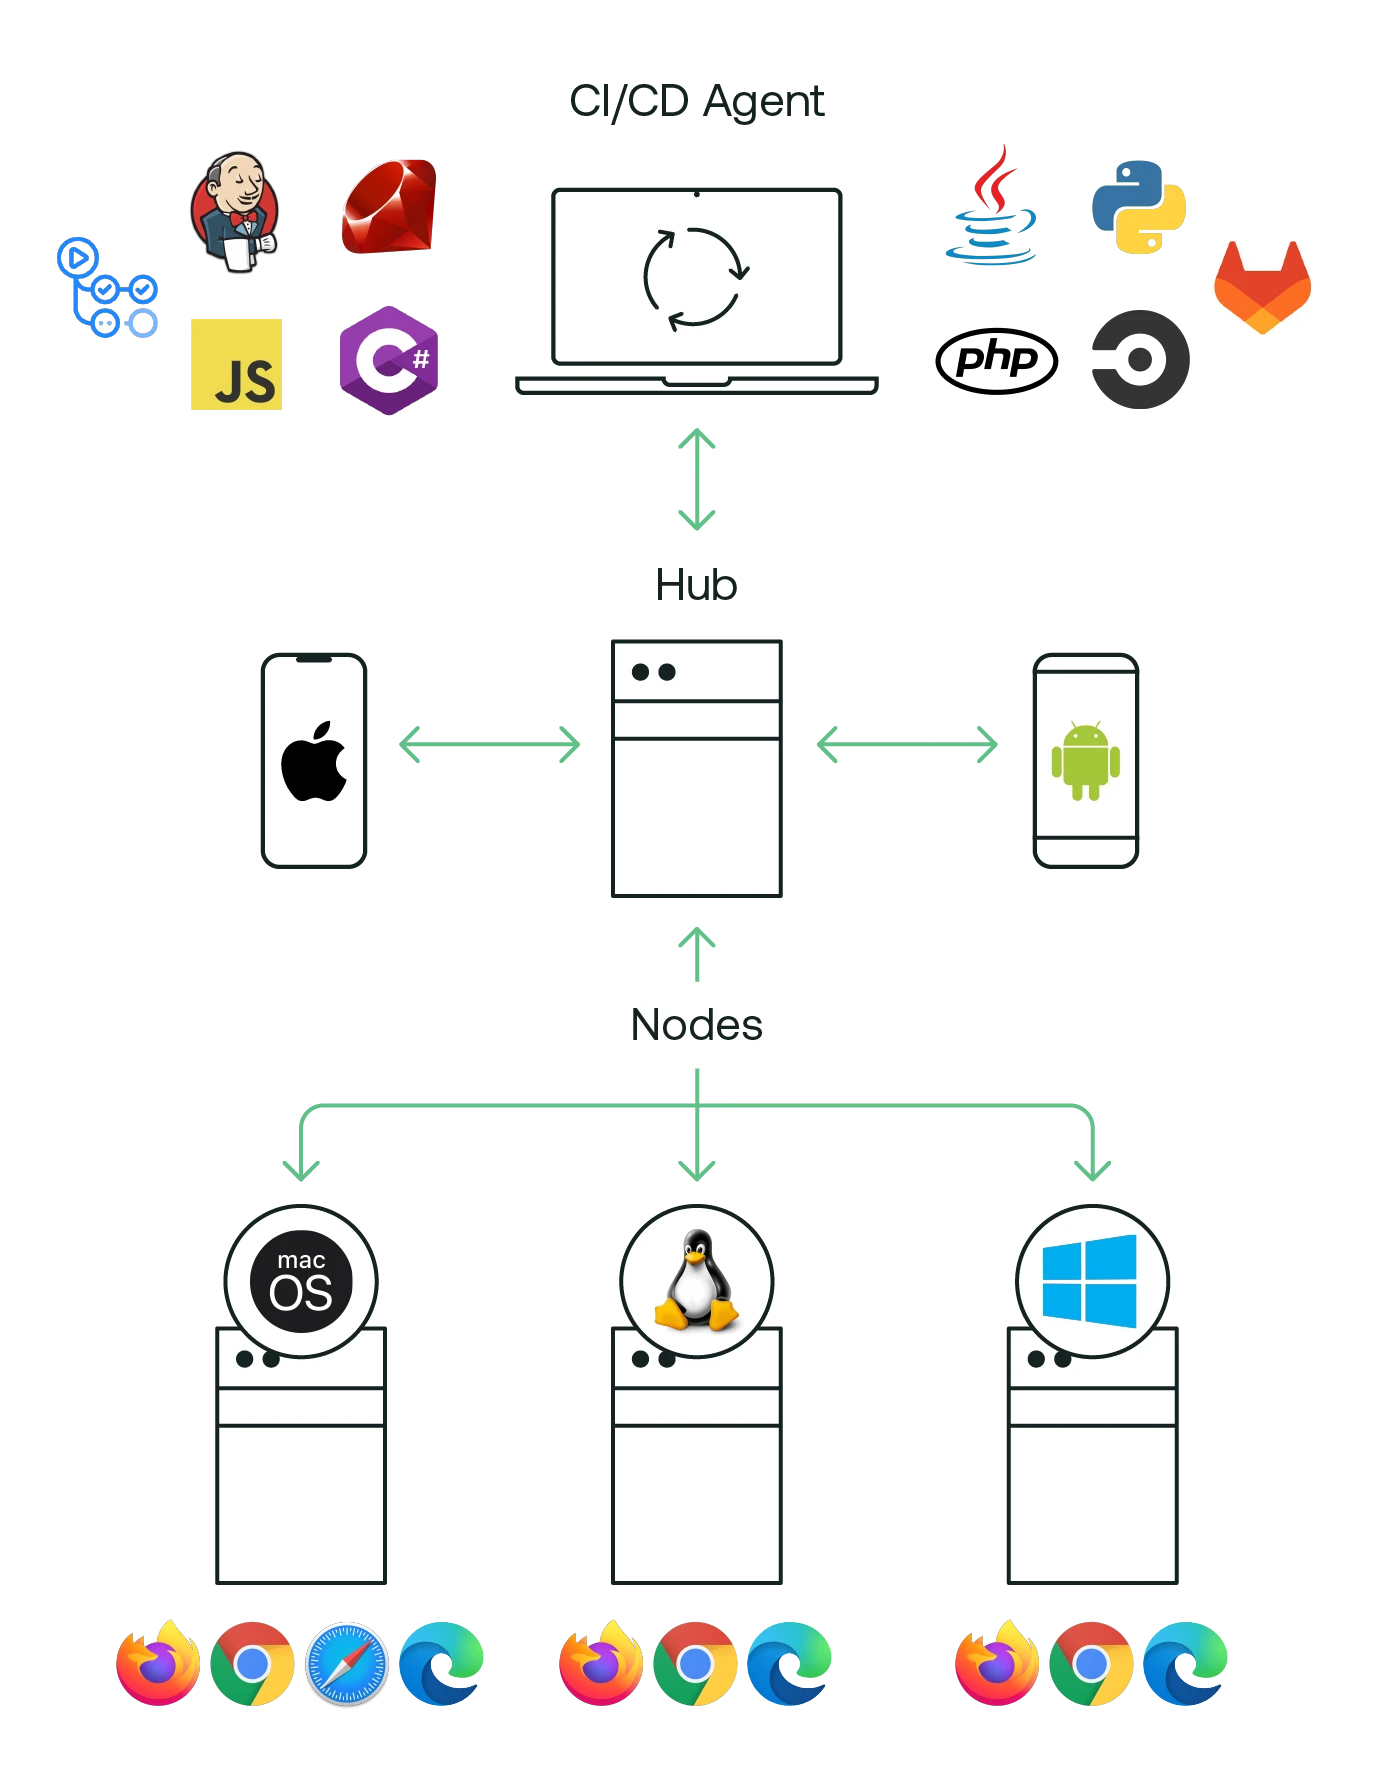
Architecture
Default Grid
Grid With Spillover/Relay Nodes
Configuration
As shown in the documentation, Relay Nodes are easy to configure. You can either write a TOML file with the details, or send the options via command line. My preference is for TOML, hence the following examples.
At the end of this section, you should have everything you need to configure and run a Relay Node, to attach to your existing Grid Hub, and watch jobs start to execute on Sauce Labs. We will start by showing you how to set up a Grid on a single machine, but if you’d like to add a Relay Node to your existing Hub, skip the next session.
Set Up the Hub
If you don’t already have one, First, you’ll need to set up a Selenium Grid Hub. You’ll need to download the selenium-server jar file, then run the following command in your favorite shell: $ java -jar selenium-server-4.4.0.jar hub
Once the hub is running, you’ll attach nodes to it.
Set Up Your Relay Node
1[server]2port = 555534[node]5detect-drivers = false6max-sessions = 10078[relay]9url = "https://<SAUCE_USERNAME>:<SAUCE_ACCESS_KEY>@ondemand.us-west-1.saucelabs.com/wd/hub"10# browser/platform configurations available11configs = [12"100", "{\"browserName\": \"chrome\", \"platformName\": \"Windows 11\" }",13"100", "{\"browserName\": \"MicrosoftEdge\", \"platformName\": \"Windows 11\" }",14"100", "{\"browserName\": \"firefox\", \"platformName\": \"Windows 11\" }",15"100", "{\"browserName\": \"safari\", \"platformName\": \"macOS 10.15\" }"16]17
Save this to a file called config-sauce.toml, and ensure that it (and other Grid config and scripts) are stored in Version Control. We will invoke this config in a bash script, as outlined below.
Let’s break this down:
Under the [relay] section, we first list the URL for the relay. This is where we specify the Cloud provider we wish to connect to, with the SAUCE_USERNAME and SAUCE_ACCESS_KEY in place
Using this URL will automatically route all configurations that either don’t match with any other Nodes, or match other Nodes that are already at capacity for that configuration
Under configs, you list the number of threads (“100” in these examples) to make available for the configuration
After the number of threads, you indicate the operating system, and an optional browser version for each line
Note: Setting each configuration equal to the total number of threads available in your Sauce Labs contract makes sense here, even though it may look like you’ll be running 400 tests at once! In the above [node] section, you’ve set max-sessions to 100, which means that the Grid will keep exact control over how many threads are executed on this Node at the same time, and will ensure you do not go over.
Start the Node
The easiest way to start this Node is with a simple command line (this assumes bash):
java -jar selenium-server-4.5.0.jar standalone --config config-sauce.toml
You’ll likely want to save this to a shell script, and version control it with the rest of your configs.
Considerations
If this node is always running a certain kind of browser (e.g., Chrome), and you’re not able to execute your Safari tests quickly, then it makes sense to lower the number of threads available to the Chrome configuration (or remove the line entirely). You’ll have to run through several iterations of this as you get by in order to tweak and tune it to be optimal.
If need be, you can even create multiple Relay Nodes that map to multiple cloud vendors or other Grids! The beauty of the Relay Node is its flexibility, and the fact that you only change configuration on the Grid side, not on the test framework or CI/CD side. This allows you to track any configuration changes in version control, and it completely separates your product functionality from any contractual or cost issues within your test infrastructure.
Mobile
Relay Nodes can also be extended to include Mobile testing, with Appium. Since Appium also adheres to the W3C WebDriver protocol, mobile tests can be attached to and executed by the same Grid, on Sauce. This removes even more of your maintenance burden as compared to a normal Grid, as mobile devices are much more maintenance-intensive than browser hosts.
1configs = [2"5", "{3\"browserName\": \"chrome\",4\"platformName\": \"android\",5\"appium:platformVersion\": \"11\"6}"7]8
Give it a try!
Conclusion
The Relay Node is a tremendous, sorely needed feature for the Selenium Grid. It allows you to build out a Grid that will evolve as your needs evolve, and it gives you an easy path for other teams to adopt your test infrastructure as your organization matures.


